How to Change Icon for Libraries in Windows 7

Technorati Tags:

In Windows 7 MS has introduced a new concept of libraries which makes managing music, pictures and documents a breeze for a typical windows user.Now with the help of this tutorial you can change the default icons of your libraries.In this tutorial we will change the icon of Documents Library.The default icon of Document library is(see screenshot below) :

libraries1

We are going to change this icon to a new icon(see screenshot below):

libraries2

Before you proceed please make sure that you have Show hidden files, folders, and drives option enabled in Folder Options. Now follow these steps to change a library icon:

  • Open windows explorer and go to

C:\Users\(your User Name)\AppData\Roaming\Microsoft\Windows\Libraries

  • Here you will see the 4 default libraries.Now right-click on the Documents library and open it with Notepad.(Libraries are normal .xml files so you can edit them using Notepad)
  • In notepad, look for this line

<iconReference>path of default icon</iconReference>

  • You just have to change the path of default icon to the path of your new icon.In this case our new icon is placed at C:\ and it’s filename is document.ico.So in our case that line will look like this

<iconReference>c:\document.ico</iconReference>

(see screenshot below)

libraries3

  • Now save the file and close notepad.The icon of Documents Library will now be changed.In the same way you can also change the icons of other Libraries that you may have.

The idea of this tutorial belongs to Bogo.

First look at Microsoft IE 8 RC1 and Download Link

First Look – Microsoft quietly released the first update to its IE8 beta 2 to its closest partners last week. This new version is marked as “Release Candidate 1” and is expected to be the final IE8 pre-release update Microsoft intends to make available to the public sometime in the first quarter of 2009. TG Daily was able to take the browser for a first spin: We noticed that Microsoft made significant progress in some areas, but is standing still others. RC1, which is believed to be the first feature-complete version of the browser, will not match the JavaScript performance of all other major browsers.

ie8rclogo

The first update to Microsoft’s browser since IE 8 beta 2 was released to select Microsoft partners for testing last Wednesday. The company indicated in recent blog posts that it was delaying the browser for some time and that it may have a good reason to do so. A final public and feature-complete pre-release would become available in Q1 2009 and, of course, we were curious what may have canceled a 2008 release of the browser.

Will Microsoft shelve the browser engine? Will Microsoft follow through with its promise to make its browser much more compliant with web standards than previous versions were? We were lucky enough to get an early look at this final pre-release and now have a good idea how IE8 will look like. But, since this software is a partner release, it is more than likely that Microsoft will make one or the other change based on feedback until a public RC1 will surface. However, significant changes are rather unlikely.

Let’s cut to the chase right away…….read more @ source

Download Link:

Download Windows Internet Explorer 8 Release Candidate 1 for Windows Vista 32-bit
Download Windows Internet Explorer 8 Release Candidate 1 for Windows Vista 64-bit
Download Windows Internet Explorer 8 Release Candidate 1 for Windows 2003 and XP 32-bit
Download Windows Internet Explorer 8 Release Candidate 1 for Windows 2003 and XP 64-bit
Download Windows Internet Explorer 8 Release Candidate 1 Readme file

How to Add Delete Folder Contents to Right Click Context Menu in Windows Vista / Windows 7

With the help of this tutorial you can add the option Delete Folder Contents to the right-click context menu which appears when you right-click a folder.This would come handy at times when you want to delete all the files inside a folder and all it’s sub-folders without deleting the folders themselves.

d

Here’s how you can do this:

  • Click on Start button, type regedit in the search box and hit enter.
  • In Regedit, go to: HKEY_CLASSES_ROOT\Directory\shell
  • Right-click on shell, create a new Key and name it Delete Folder Contents

2                                           v

                                                      v3

  • Again right-click on Delete Folder Contents, create a new Key and name it command

4

  • In the right pane, double-click on (Default) string value and type

       cmd /c "cd /d %1 && del  /s /q *.* in the value data field  and hit OK

5

  • Close Registry Editor and your done.

Turn on Sidebar with UAC disabled in Windows 7

If you have Windows 7 Beta installed with UAC disabled you might run into problems while trying to load gadgets onto your desktop.You can enable the UAC in order to use Sidebar.But if you don't wanna turn on that nagging UAC and still love those tiny useful gadgets you can bring them aboard by following these steps:

  • Click on Start button, type regedit in the search box and hit enter.
  • In regedit, go to :
HKEY_LOCAL_MACHINE\SOFTWARE\Microsoft\Windows\CurrentVersion\Sidebar\Settings 
  • In the right pane,right-click and select DWORD(32-bit) Value from the New menu.
  • Rename the DWORD Value to AllowElevatedProcess. Double-click on it and type 1 in the Value data field.

Capture
  • Close Registry Editor and try to load the gadgets.They should work.

Thanks Chris for finding the registry

How to Enable or Disable Taskbar Thumbnail Preview in Windows 7

Posted on Jan 16, 2009


Follow the steps given below to disable the Thumbnail Previews: 

 
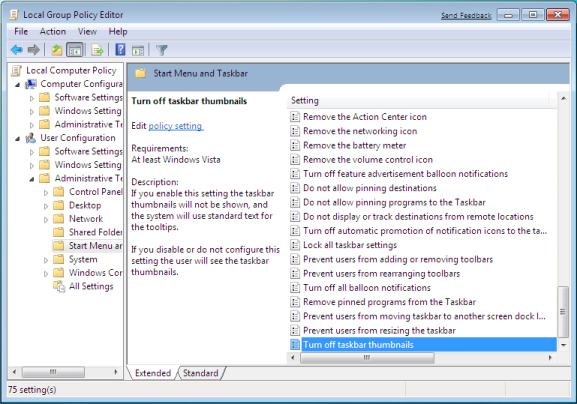
1. Click on start and type on search bar gpedit.msc and press enter
2. Now navigate to User Configuration, Administrative Templates, and Start Menu and Taskbar in left pan of Group Policy Editor

 
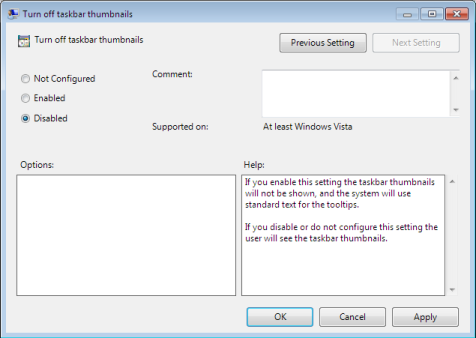
3. Locate “Turn off Taskbar Thumbnails” in right pan of Group policy editor and double click on it.
4. Select Disable, click Apply and Press ok
5. Now check your Taskbar, it shouldn’t show Thumbnails Preview .
In order to Enable the Taskbar Thumbnail Previews again,  select Enable in step 4.
Please Note: Taskbar Thumbnail Preview only works when you haveEnabled Aero in Windows 7.


Source

How to Speed Up Taskbar Thumbnails in Windows 7


Posted on Jan 14, 2009


Windows 7 brings a new enhanced Taskbar a.k.a Superbar, the most interesting changes  made in the GUI. When you hover your mouse on the program icon, it shows the thumbnail previews of the program.You can change the delay time that the mouse pointer has to stay hovered over an item before that item's thumbnail preview is displayed.

Here's how you can do this>>>

1. Click on the Start button, type regedit in the search box and hit enter.
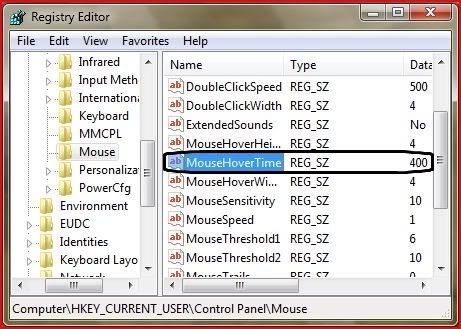
2. Now you'll have Registry Editor open. Navigate to HKEY_CURRENT_USER\Control Panel\Mouse


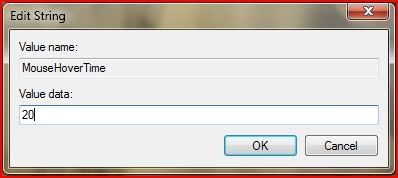
3. In the right pane, double-click on MouseHoverTime and type any value less than 400, say 20 in the Value data field (the values are in milliseconds). If u want them to appear ultrafast then type 0.


4.  Now close Registry Editor and restart the computer to see the results.
Now hover your mouse on any taskbar icon and see if thumbnails are appearing faster than before.

How to burn ISO/IMG files in windows 7

Posted on Jan 13, 2009

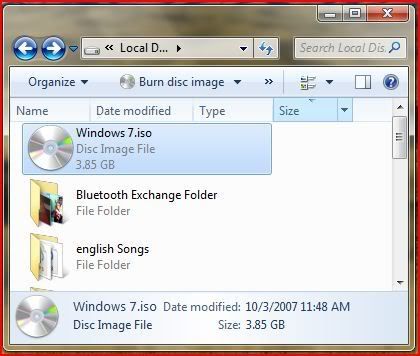
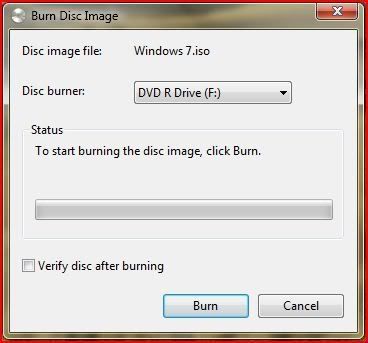
Windows 7 has now got a built-in Disc Image Burning Tool. Now we can easily burn ISO files using this tool. Though it doesn't support formats like Bin, Nrg and lots of others but atleast the widely used is now supported.

  Here's how you can do this>>>
  1. Double-click or right- click any iso file that you want to burn (make sure u've a blank cd/dvd media inserted in cd/dvd burner)
  2.A window will pop-up. Here select ur CD/DVD drive and click on Burn button   given below.


  3.You can also check the "Verify disc after burning" option to verify the disc. ( i personally never used it even in nero, it takes longer time)

    Install Windows 7 via USB or SD Media

     Posted on Jan 12, 2009

     
     So Windows 7 beta is out the door and you are ready to begin your beta experience.  Over the next few months there will be additional builds for Windows 7 (x86 and x64) as well as Windows Server 2008 R2 and that leads to a lot of installs and a lot of DVD burning and useless DVDs as soon as a new build is out.  So why not install from USB or whatever other removable media your computer can boot from?  Insert your removable media into a Windows XP or Vista PC and run the following commands from an elevated command prompt. 
    1. diskpart
    2. list disk (find the disk number for the removable media)
    3. select disk #
    4. clean
    5. create partition primary
    6. select partition 1
    7. active
    8. format fs=fat32
    9. assign letter=y (or any free drive letter)
    10. exit

    Once that is complete mount the ISO and run the following command.

    xcopy x:\*.* /s/e/f y:\

    Where “x” is the drive letter of the mounted ISO.  Once complete boot off the device and install the OS.  When a new Windows 7 or 2008 R2 build is released, simply delete the contents, rerun the xcopy command and you are ready to go again.  As a note this also works for Windows Vista and Server 2008 but you already figured that out :) 

    Windows 7 : Maximizing and Restoring Windows made easier

    Posted on Nov. 2, 2008


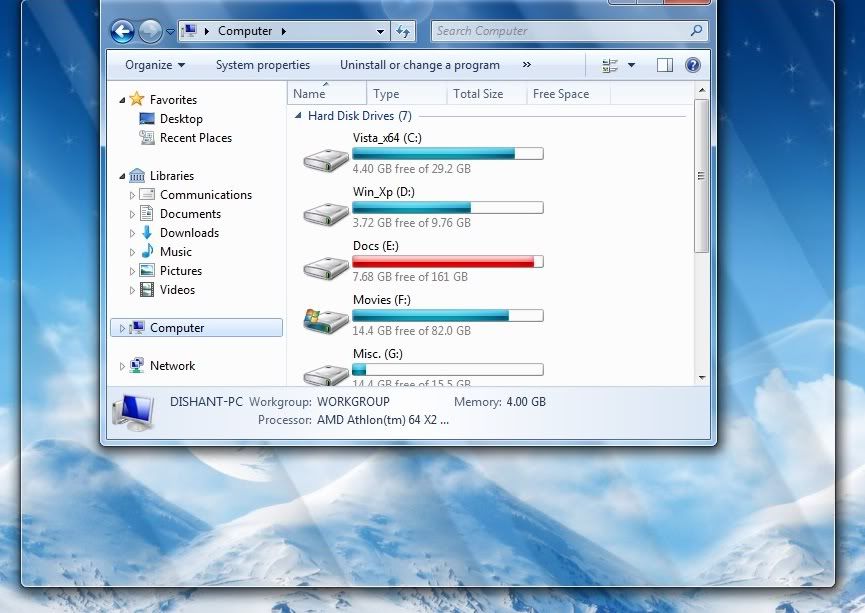
    As Windows 7 making news all over the web about it's new features like Superbar (new taskbar), Jump lists and the Ribbon interface etc.,i decided to try it out and i am quite satisfied with the OS as it is performing so well being in the pre-beta stage.
          
    One cool feature that i found in Windows 7 is that now we can maximize a window just by dragging it to the upper edge of our desktop and restore it just by doing the reverse. When you drag a window to the left edge of the desktop it occupies the left half of it. While you drag a window to the upper edge of the desktop in order to maximize it, you see an imaginary window frame with a  bubble like effect originating from the point where your mouse pointer touches the upper edge of the screen and it looks cool. (see screenshot below)


    Google Preview Add-On For Firefox

    Posted on Sept. 9, 2008


    Mozilla Fiefox is known for a large number of Add-ons that makes the best browser even better.In the long list of those powefull Add-ons, here comes another one GooglePreview 3.13. The GooglePreview 3.13 shows preview thumbnail images of websites you are searching on your google and yahoo searches. It not only makes the searches look better but can help you make a better choice of which page to go to.


    You can switch back to normal mode by clicking that small GP icon in the bottom-right corner of browser window.

    Download Link
     

    Creating, Installing & Managing Google Chrome Themes

    Posted on Sept 9, 2008


    As of now, Google Chrome BETA does not support themes officially and provides no way to manage them, However, free software are now available to easily create, install and manage themes for the browser.

    Google Chrome Firefox Theme


    Xchrome Theme Manager is the first and only software currently available to install and manage Google Chrome Themes, The free software is still in BETA but lets you fully automate the installation of Google Chrome themes without any hassles.

    XChrome Theme Manager
    Xchrome Theme Manager Features:
    • Automated Theme Installation.
    • Edit and build your own Google Chrome themes.
    • List of all Google Chrome installed Theme with preview and author details.
    • Theme Installer for creating single click Google Chrome theme installers.

    Sign in With GMail, Yahoo or any other email A/C in Live Messenger

    Posted on Sept 8,2008

     
    With the help of this Tutorial you can sign in to Windows Live Messenger using your Gmail, Yahoo or any other account, no need to install any other Messenger.Let us see how its done, For example say you want to use your Gmail as Windows Live ID and you want it to use for Windows Live Messenger.


    Go to Windows Live ID or just Windows Live ID which will take you to the link. Scroll down to “Sign Up Today” > “Use an e-mail address you already have” > And click on the link Get started now. This link will open up a Create Credentials page. Just fill up with your Gmail address you want to use and set password. This password may not be same what you had given for Gmail address while registering it. Fill the form completely and Press Continue. So this creates your credentials for Gmail.


    After that you will get two mails sent to your Gmail address. One will to “Confirm your e-mail address for Windows Live ID” and the other mail “Welcome to Windows Live ID”. So once you confirm your e-mail, you are ready to use your Gmail as Windows Live ID.


    Here you can see I am signed into Windows Live Messenger with my Gmail as Windows Live ID.


    source

    Fix: Dragging a Folder does not create Shortcut in Favorite Links in Vista

    Posted on Sept. 8, 2008


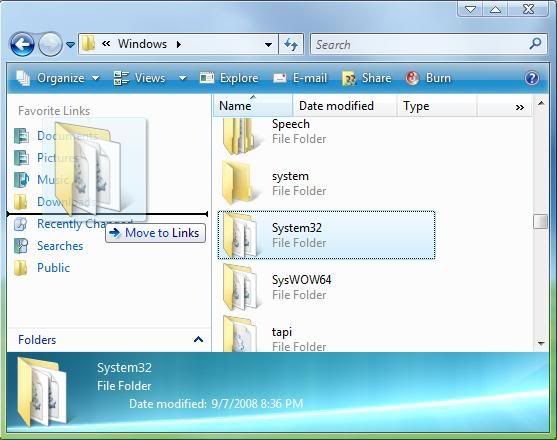
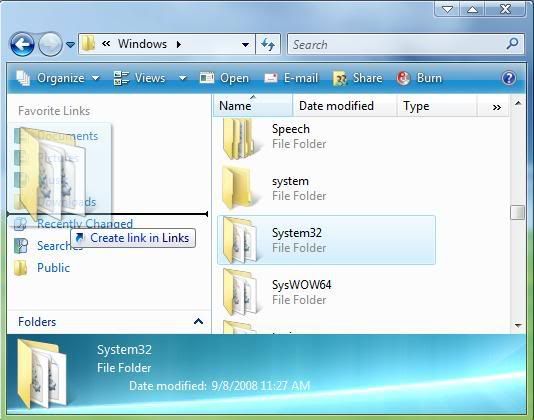
    In Windows Vista we have got Favorite Links under Windows Explorer where we can place shortcuts to folders for easy access. But I've seen a problem on some vista pc's where when i tried to create a link for a folder by dragging it in the Favorite Links area, the whole data inside that folder including sub-folders were moved to the Links folder which was not supposed to be.(see screenshot)


    The solution of this lies in the Desktop.ini file in the Links folder. Open it with Notepad and look for the line DefaultDropEffect=4, if that's missing then copy and paste it after the line:


    IconResource=%SystemRoot%\system32\imageres.dll,-185.


    Now save the file.The DefaultDropEffect line sets the default drag-and-drop action. Setting it 4 creates a shortcut of the dragged folder in the Links folder.


    After that right-click on the desktop.ini file and set its attribute to Read-only and Log off Windows. Now you should be able to create a link in the Favorite Links area by dragging a folder instead of moving it.(see screenshot)


    Add Your Favorite Program Shortcut in IE 8 toolbar

    Posted on Sept 7, 2008

     
    This tutorial will show you how to add your favorite program shortcut in IE 7/ IE 8 toolbar. You can add any program you want. In our example we will be using CCleaner which can be used for removing cookies, url history, temporary internet files, recent typed url's etc. etc.
      
    Here's how you can do this>>>
     
    • First install CCleaner.
    • Download CCleaner icon from here.
    • Extract the zip archive to a folder on your hdd.
    • Move the ccleaner_app.ico from the folder to your CCleaner installation directory( which is normally C:\Program Files\CCleaner\).
    • Click on Start button, type regedit in the search box and hit Enter.
    • In Registry Editor, navigate to HKEY_CURRENT_USER\Software\Microsoft\Internet Explorer\.
    • Right-click on Internet Explorer, select Key from New menu and type Extensions.
    • Again right-click on Extensions, select Key from New menu and type {7A8B2368-E336-49c5-A762-0FF3E7E09DDE}.
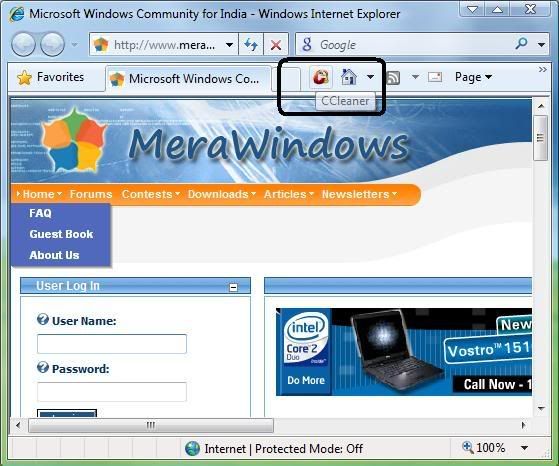
    • Select this Key and move into the right pane. Here we will create some strings as given in the screenshot below with their respective names and values.

     
    • Close the Registry Editor.
    • Open Internet Explorer and see if you got the CCleaner icon in the toolbar as given in the screenshot below:


    If you can not see it on the toolbar, you can get it by customizing the toolbar.

    How to Customize Quick Access toolbar in MS Word

    Posted on Sept 6, 2008
    The design of Word 2007 is significantly different from previous versions of Word. So it is understandable that frequently used commands are difficult to find.Long-time users of Word may find the Ribbon disorienting. But the Quick Access toolbar puts important commands a mouse-click away.

    When you install Word 2007, only three commands appear on the Quick Access toolbar: Save, Undo, and Redo.Fortunately, you can add more commands to the Quick Access toolbar. You won’t want to add too many, as this could slow you down.
     
     
    To add a command to the Quick Access toolbar, click the downward-pointing arrow beside the toolbar.You can select from any of the commands that appear. Or, you can click More Commands if you don’t see the one you would like to add.

    In the box labeled “Choose commands from,” select a category. In the box below that, select a command. Click OK
     
      
    The command will appear on the Quick Access toolbar.
     
     
     Now you have your own set of commands in there.

    Remove Shutdown options from Vista Start menu

    Posted on Sept 6, 2008
     
    In this tutorial i'll show you how to remove the Shutdown, Hibernate, Sleep and Restart options from the start menu in case you don't want them to be there and also from the Windows Security screen which appears when you press Ctrl+Alt+Del.
     

    Here's how you can do this>>>
    •  Click on the Start button.
    •  Type gpedit.msc in the search box and hit Enter. 
    •  Click Continue to bypass UAC prompt. 
    •  In the left pane, navigate to User Configuration>>Administrative  Templates>>Start Menu and Taskbar 
    •  In the right pane, double-click on Remove and prevent access to the Shutdown, Restart,Sleep, and Hibernate commands. 


    • In the dialog box that appears, click on Enabled radio button and then OK.
    • Exit from Local Group Policy Editor.

    New Aero_Redefined theme for Windows Vista

    Posted on Aug 4, 2008

    I've created a new Aero_Redefined theme for Windows Vista keeping in mind the simplicity of the default windows Aero. It does not contain any special stuff but has a sober and elegant shellstyle that may suit your liking. As it's my first theme, tell me how is it by giving some comments which would help me in doing better in future.


    How to install>>>


    1.To install this theme you need to patch your system, via VistaGlazz or TuneUp Utilities.

    2.Next unpack “Aero_Redefined”
    to ‘C:\Windows\Resources\Themes’ (where C is the partition with Windows installed)

    3.Now you can change the visual style by clicking any .msstyle file, or via   ‘Control Panel\Appearance and Personalization\Personalization\Window Color and Appearance’
      
    Download Links:


     Aero_Redefined 

     VistaGlazz
     

    How to Hide video, audio or doc files in a single image file

     Posted on Sept 2, 2008


    Today i'll show you a cool trick of hiding any video, audio or document files inside a jpeg.With the help of this trick you can hide your personal files like word documents, videos, audio files etc.in a single image which you can put in anywhere, say, in your wallpapers. Lets see what i'm talking about:

    Here's how you can do this>>>
    • Choose the files which you wanna hide into the image. In our ex. i want to hide a mp3 file(1.mp3)+an avi file(2.avi)+a word document(3.doc).
    • Pick any image(guitar.jpg in our ex.) in which you want to hide your files.
    • Create a new folder in C:\, give it a name, say, secret.
    • Now put all the files which you wanna hide and also that image file into that folder.


    • Now compress the 3 files which you wanna hide using winrar/winzip.

     
    • The archive.rar contains our 3 files. So delete those 3 files from the folder.
    • Go to Start>>Run and type cmd.
    • Get inside our secret folder.
     

    • We'll be using the following syntax : “copy /b image.jpg + winrar.rar newimagename.jpg” (without quotes).
    • In our case the command will be:  copy /b guitar.jpg + archive.rar  wallpaper.jpg
    • Press enter to execute the command.
       

    • You will get a message “1 file(s) copied”.
    • Now you will get a wallpaper.jpg file in the secret folder.


    • Delete all the files except that newly created jpg file.
    • Now right click that wallpaper.jpg file and open it with Winrar.
                
    You can see the 3 files hidden in that jpg file. Now you can simply put this wallpaper.jpg file in a group of image files and no one will notice it.

    Eight ways to save time with Windows Vista

    Posted on Sept 1, 2008

    Windows Vista comes with loads of features that can help save you time, especially with tasks that you perform regularly. Try out these tips and see how much time you can save


    • Send an email straight from your desktop

    If there’s someone you often send mail to, you can add a shortcut to your desktop to create a new email. Make a new shortcut and type in mailto: followed by your recipient’s email address, for example mailto:windowsvista(at)futurenet(.)co(.)uk. Click Next, give the shortcut a meaningful name and then click Finish. The new shortcut will appear on your desktop, and double-clicking it will open up a blank email in your default email editor with the recipient’s address already filled in.


    • Quickly check your network connection status from your desktop

    You can create a shortcut to quickly check the status of your internet connection, saving you the effort of clicking through a number of windows and folders. Go to Start > Control Panel > Network and Internet > Network and Sharing Center > Manage network connections. Right-click on the connection you want to check the status of and select Create Shortcut. This will place a shortcut on your desktop, and when you double-click it you will be taken directly to the status page of your connection.


    • Create shortcuts to your favourite web sites

    You can save time by having shortcuts to frequently visited web sites on your desktop. Browse to the page that you want quick access to, and then drag and drop the small icon on the left of the address bar to your desktop. Now all you need to do is double-click the shortcut to go straight to the page.


    • Get all your breaking news in one place with RSS feeds

    If you have a number of news sites that you check regularly you can save time by subscribing to their RSS feed (click on the orange RSS icon on the web site). This sends their latest headlines directly to your RSS reader (such as Microsoft Outlook or Internet Explorer), allowing you to keep up to date with all your favourite sites in one place. The RSS feed for this web site is
    www.windowsvistamagazine.com


    • Use Start Search

    Use the Start Search to quickly launch programs rather than trawling through your computer to get them. Below are some handy phrases to type into the search to bring up the application straight away. Depending on what you have installed on your computer you may be able to find other phrases to launch your programs with, so it is worth experimenting.

    CMD Command prompt
    DEV Device Manager
    SYS System Restore
    NETW Connect to a Network Projector
    UPD Windows Update
    PROG Default Programs
    EVE Event viewer


    • Get the App Launcher sidebar gadget

    There are a number of gadgets available from Windows Live Gallery that can help you speed up your computer use. The App Launcher gadget grants you fast access to files and folders by clicking on an icon that instantly launches them. It helps keep your desktop and Quick Launch free from clutter. ]


    • Install Launchy

    Launchy is a powerful keystroke launcher, which is accessed by pressing Alt and Space bar. You can then type in the name of the application, file or web site you want to launch and press Enter. Launchy is intelligent enough to guess pretty accurately what you are looking for whilst you type, so by just typing goo then pressing Enter will open Google. You can download it for free at www.launchy.net


    • Use Task Scheduler to automate tasks

    Save yourself a lot of time by using Task Scheduler to make Windows Vista automatically perform certain tasks. Type ‘Task Scheduler’ into Start Search and select what you want it to do, from defragmenting your hard drive to backing up your files, and when.

    source

    Make your Desktop Background permanent in Vista

    Posted on Sept 1, 2008


    If you like your desktop background wallpaper and don't want anybody to change it then this tutotrial will be useful for you. The tutorial consists of two steps:  

    1. Removing the Desktop Background option from the Personalize appearance and sounds screen.  
    2. Disabling the Set as Desktop Background option which appears on right-clicking an image.

    But before doing that you shud set your favourite wallpaper on desktop.

    Here's how you can do this>>>

    1.Removing the Desktop Background option

    • Click on the Start button
    • Type gpedit.msc in the search box and hit Enter. This will open Local Group Policy Editor.
    • In the left pane, navigate to User Configuration>>Administrative Templates>>Control Panel>>Display.
    • In the right pane, double-click on Prevent changing wallpaper.


    •  In the dialog box that appears, click on Enabled and then OK but don't close GPEditor.

     2. Disabling the Set as Desktop Background option

    • In the left pane of the local group policy editor, navigate to User Configuration>>Administrative Templates>>Desktop>>Desktop


    • Moving into the right pane, double-click on Desktop Wallpaper.
    • Click on Enabled radio button.
    • In the Wallpaper Name field, type the full path of the wallpaper you want to display.
    • In the Wallpaper Style field, select whether you want the wallpaper to be in Center, Stretch, or Tile style.
    • Click OK and exit the Local Group Policy Editor.
    • Reboot your system to reflect the changes.