Evolution of the taskbar in Windows 7 - “Superbar”

Posted on Aug 30, 2008

 
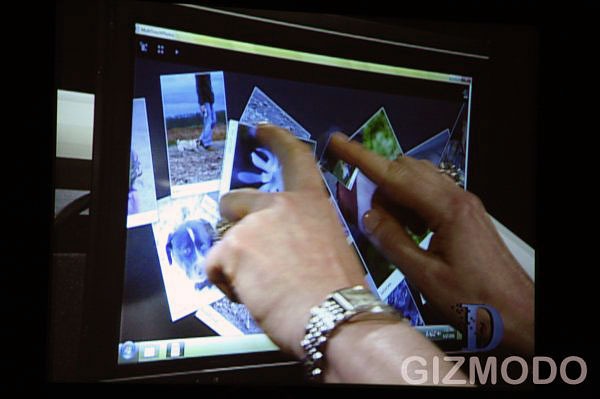
Some of you with a sharp eye might have noticed something very interesting on-screen during the Windows 7 multi-touch demonstration at the D6 conference yesterday. If you did, you might be curious to understand what you saw. If you didn’t, read on anyway. Update: The new taskbar is superficially called the “Superbar”.


Picture credit: Gizmodo
The picture above comes from the video feed of Julie Larson Green’s (Vice President of Windows Experience Program Management) demo of the multi-touch picture browser demo app. The quality is a little rough, but you can easily notice a few things that are different.

The first being the taskbar is higher than usual, but not as big as double-height. If I were to guess, I’d say its somewhere around 1.75x-high. In the left corner, the Windows orb remains wedged “on top” of the taskbar - sticking its head out a little - instead of in the center like it is today in Vista.

The taskbar also appears ‘divided’ into sections by variations in the color (dark, gray, lighter) to indicate the different areas. Speaking of which, if you look at the far right corner, you’d notice that the tray (icons & clock) is not touching the edge of the screen, and there’s a small lighter gap. I have no explanation for this, but is well worth keeping an eye on.


A double-height taskbar in Windows Vista


Keeping the focus on the right, the tray is also different. The icons sit in the middle of the taskbar, instead of wrapping in two-lines like it does today, whilst the date now wraps on two lines instead of three. This clearly indicates this taskbar cannot accommodate three lines of text........continue reading

Access Windows Registry through Explorer Shell in Vista

Posted on Aug 30, 2008


We all know how important Windows Registry is when it comes to tweak settings in windows. We use it to customize the way windows works. To make any changes in registry we have to run Registry Editor which can be done in many ways. But there is an alternative of not going to Registry Editor and that is the Windows Vista Registry Shell Namespace Extension.This Shell Extension allows Windows Explorer to be able to view and interact with the Windows Registry. You can search, edit, create or delete registry information via windows explorer.It also demonstrates new concepts in Vista including the property system extensibility and content indexing.


See how it works:


Download : 
 

Tweak the Recycle Bin Context Menu in Vista

Posted on Aug 29, 2008

With the help of this tutorial you will learn how to add a program of your choice to the Recycle Bin context menu for easy use in Windows Vista. As an example I will be using the program TuneUp Utilities.

Here's how you can do this>>>
  • Click on the Start button.
  • In the search box, type regedit and hit Enter.
  • Click Continue to bypass button the UAC prompt.
  • In regedit, navigate to
    HKEY_CLASSES_ROOT\CLSID\{645FF040-5081-101B-9F0B-00AA002F954E}\shell
  • In the left pane, right click shell and click Key under the New menu.
  • Type the name of the program TuneUp (you can type anything you wish, it just makes sense to give the name of the program) and press Enter.
  • Again in the left pane, right click on the TuneUp key we created in the above step and click Key under the New menu.
  • Type command and hit Enter.

  • Moving into the right pane, double-click on (Default) and click Modify
  • In the Value data field, type the full path of the program.exe file

  • Click OK to apply
  • Exit Registry Editor and you're done.
  • You can add as many programs as you want. Just repeat the same steps for each program.

Intel shows off 16 GB DDR3 DIMMs at IDF

Posted on Aug 28, 2008

San Francisco (CA) – You can’t have enough RAM, as is often said in the computer world, and Intel has demoed 16 GB RAM sticks at its Intel Developer Forum in San Francisco.  The RAM is made by Hynix and uses technology from MetaRAM to stack all the individual DRAMs onto the stick.  Intel reps showed off the memory inside a number crunching server that was populated with 10 of these sticks for a total capacity of 160 GB of memory – heck some people don’t even have hard drives this big.

The server was running dual Nehalem EP processors and was churning through a massive 100 GB for the top ten customers of a company.  An Intel rep told us the program had loaded the file into RAM and this gave approximately a 1000 times speedup versus doing the same computation from the hard drive.

The upcoming Nehalem processor will use triple channel DDR3 memory so you’ll need to fill three memory slots for maximum memory bandwidth. source

Click image to open!
Click image to open!Click image to open!Click image to open!

IE8 Beta 2: Great new features, old annoyances

 Posted on Aug 28, 2008
 
Image 


Useful new features

It is obvious that Microsoft’s IE engineers had some innovation pressure from some management levels above and there are, in fact, a few interesting features. First, there is finally a “Find on this Page” feature you can actually use, since it is placed in its own field below the address bar. Searching web pages for certain words or phrases is also enhanced through search result highlighting and search result count.

Just like Firefox, IE8 can also store a browsing session and reopen it when the software is restarted.

The “Smart Address Bar, which offers a neatly structured, instant search feature when you are entering a URL, is also new. Similar to the Firefox idea, the Address options are very organized, easy to read and in most cases actually useful – especially when you are looking for a certain section on a website and simply don’t know its sub-level address.

The best new feature, hands down, is Tab grouping. At least I tend to have countless tabs open and once you exceed ten or more tabs, it gets confusing and you have to start reorganizing those tabs. IE8 does that for you in a color-coded fashion. The colors themselves are a matter of taste, but as long as you are opening tabs through the context menu (right mouse click), a new tab will appear in the color of the originating website. This feature is a perfect example how simple ideas can have a huge impact.

Tabs now also come with “crash recovery”, which means that the content in a tabbed window is automatically restored and reloaded - and any information the user may have already entered on the page (such as when writing an e-mail or filling out a form) is restored.

Under the hood, there are new features you won’t see in the user interface - which, however, are milestones for Microsoft. First, the browser is much closer to common web standards than any other version before (Microsoft says it passes the Acid2 browser test), CSS 2.1 will be implemented in the final version of the browser, there are Document object model (DOM) and HTML 4.01 improvements and there is support for W3C’s HTML 5 Draft DOM Storage standard and the Web API Working Group’s Selectors API.


Useless new features    

Microsoft would not be Microsoft if there wasn’t an overload of features that in fact make the browser (12.7 MB download) appear bulky. Each user may have a different opinion what these features may be, but at least in this version it seems to be Microsoft’s Web Slices and Accelerators (renamed from “Activities”). On one side, Microsoft promises to stay within general HTML guidelines and on the other the company cannot resist to create proprietary features that are not part of any standard and are not supported by any other browser. Is it just me or does this sound strange?

Both Web Slices (a way to subscribe to certain content) and Accelerators (quick access to maps, for example) are obviously a try to standardize certain features and convince web developers and other browser developers to adopt this functionality. To me, both features are nice and may be certainly useful in some cases, but will they improve your browsing experience in general? No. In some scenarios, IE8 feels too heavy. The browser interface clearly needs another workout to trim some of the fat it has gained over the years. 


Old Microsoft habits


The installation process of the browser remains unacceptable and one big annoyance. Even on my relatively speedy PC, the installation process took 28 minutes from beginning to end. For 17 minutes, the PC was unusable, since the PC needs to be restarted and updates need to be reconfigured.

Why is it that Firefox can be downloaded and installed on the go without the need for a restart of the PC and Microsoft takes my PC hostage for 17 minutes for a simple browser update? I may be picky here, but iE8 is not particularly convenient (and transparent) to install. (this is the worst thing for me)

You can download IE8 Beta 2 here.

Read Full Artile Here (it's a must read)

Adobe Photoshop CS4 Codenamed StoneHenge Leaked !!

Posted on Aug 27, 2008
I was quite surprised today when I saw an email in my Inbox letting me know that Adobe Photoshop CS4 (codename Stonehenge 11.0) has been leaked.Many tech blogs and forums are reporting leak of Adobe Photoshop CS4 Codenamed StoneHenge on torrent sites, After doing some research and reading the contradicting comments this 454.57 MB download seems fake to me, since downloading and installing such thing is illegal, I am unable to verify this myself.


The reported compilation date of this build is 1st November 2007, the above version is said to have fixes for Vista users.

Automatically Backup Your Firefox Environment To Box.net

Posted on Aug 27,2008

Few days ago my Firefox profile got corrupted and resulted in loss of essential data, Loosing your browser's saved passwords, bookmarks, settings and customizations can be very frustrating if a lot depends on it, While searching for Firefox profile backup solutions, I came across FEBE - A simple to use, highly customizable Firefox Environment Backup Extension, unlike other Firefox backup and restore solutions FEBE lets you automatically backup your browser data of choice to Box.Net free online storage service, allowing you to easily synchronize your office and home browsers. 


 FEBE lets you backup your Firefox extensions, themes, bookmarks, preferences, passwords, cookies and just about everything else Firefox offers (it can even backup/restore your entire profile).
Features:
  • Schedule automatic backups on a daily, weekly, or monthly basis.
  • Save backups in time-stamped folders to easily identify when the backups were created. Specify how many folders you wish to keep and FEBE removes the oldest.
  • Backup reminder. FEBE can alert you if a backup has not been completed in a specified number of days.
  • User-defined backups. Make backups of virtually any file or folder - Firefox related or not. Just specify what to backup and FEBE does the rest.
  • Upload backups to your remote Box.net account automatically or with a single click.
  • Verify your extension directory. Upgrading to Fx 3.0 sometimes leaves garbage in the extensions directory. FEBE can clean it up.
  • Quick Backup. You can quickly backup as many or as few individual extensions/themes as you like. They can be saved together in a single, installable xpi file (Similar to CLEO). 
Download 

FEBE Homepage

Customize Vista Logon screen with a Text Message

Posted on Aug 26, 2008

With the help of this tutorial you can display a Message Title and Text of your choice. This message will be displayed on a screen which will appear before the logon screen in Windows Vista.


Here's how you can do this>>>

  • Click on the Start button, type regedit and hit Enter
  • Click Continue to bypass the UAC
  • In Registry Editor, navigate to HKEY_LOCAL_MACHINE\SOFTWARE\Microsoft\Windows\CurrentVersion\Policies\System


  • Move into the right pane, double click on legalnoticecaption and click Modify
  • In the Value data field, type a Title of your choice say "Warning ! Danger Ahead" (without the quotes) and hit Enter.
  • To give a text, double-click on legalnoticetext given right below and click Modify again.
  • In the Value data field, type a text of your choice say "Tighten your seat belts and Get ready to explore the World of Windows Vista"(without the quotes) and press Enter.
  • Exit Registry Editor and Log off to see the changes.

This is how the screen shud look:


Prevent Access to Removable Storage Devices in Vista

Posted on Aug 26, 2008

This tutorial will show you how to prevent access to all removable storage drives like CD, DVD and USB Pen Drives in Windows Vista. This will be useful in order to prevent any kind of unwanted data to be copied or moved to your computer and also to prevent harmful programs that can access your computer from any removable devices.


Here's how you can do this>>>
  • Click on Start button, type gpedit.msc in the search box and press Enter
  • Click on Continue to bypass the UAC prompt.
  • In the left pane, navigate to User Configuration>>Administrative Templates>>System>>Removable Storage Access
  • In the right pane, double-click on Removable Storage Access: Deny all access
  • In the dialog box that appears click on Enabled.
  • Click on OK.
  • Exit Local Group Policy Editor and Log off
  • After you Log on insert a CD/DVD and check n see if you can access it's contents or not.

Make your own Custom Title Styles in MS Word 2007

Posted on Aug 25, 2008


This tutorial will show you how to create a custom style for a Title in MS Word 2007. Sometimes after formatting a heading, you have to change the paragraph style back to Normal manually but you can get rid of this by creating custom Title styles and let the Word do the rest for you.

Here's how you can do this>>>

  • Press Ctrl+N to create a new document and type anything say My Title
  • Change the font size to say 20 points.
  • Select My Title and Press Ctrl+B and Ctrl +E to make it bold and centre align.
  • click on Home and click on Styles dialog button located in the bottom right corner of the Styles group


  • Click on the New Style button given in the bottom left corner of the Task Pane(see above screenshot)
  • Type My Title Style in the Name field.
  • In the Style for following Paragraph drop-down list, choose Normal.
  • At the bottom of this dialog box you can see two options : 1. Only in this Document 2.New Documents based on this Template. If you want to apply this Custom Title Style in the current document only then select the first option and if you want to have this Custom Title Style to be available in all the Documents you work with select option 2.


  • Click on OK
  • The My Title Style style should appear in your Task Pane. Now the next time when you type a title text, click My Title Style style in the Styles Task pane. Word automatically formats the title text for you. When you press Enter to begin typing the next paragraph, Word will automatically switch back to the Normal style. You can use the same procedure for creating custom headings that can save your precious time while defining styles and a lot of keystrokes.

The ultimate cool tool for Windows Explorer

Posted on Aug 25, 2008

The StExBar provides many useful commands for your everyday use of Windows explorer. And you can add as many custom commands on your own as you like.

StExBar screenshot

See how it looks in action:


Have you ever needed to open a console window while you were using the explorer? And to have that console already set to the directory you're showing in explorer right now? Well, StExBar provides that with one simple mouseclick. There's also a hotkey defined for this: simply press Ctrl-M to open the console.

A 'lightweight' console is also available. Simply enter the command you like to execute into the edit box on the right of the StExBar and hit enter. The command will be executed in the system console.

Have you ever needed to have the name or full path of one or more files in another application? Ctrl-C doesn't work here, that won't copy the file path but the file itself. StExBar comes to the rescue. It provides two commands, one to copy all selected file/foldernames to the clipboard, the other copies the whole paths of all selected items. To make it even more easier to use this, a hotkey is defined Ctrl-Shift-C which copies the selected paths.

creating a new folder

Creating new folders is a common task in explorer. But to actually do that, you have to right-click on a folder background, choose "New" from the context menu, wait until the submenu finally appears, then choose "Folder" from that submenu. Not anymore! StExBar provides you the same with one easy click. Or even faster with the assigned hotkey: just press Ctrl-Shift-N and you have a new folder created in the current directory.

StExBar can also help you renaming multiple files at once. It uses Regular Expression strings to do so.

You can add your own commands to the StExBar and define hotkeys for them.


Download

Source

ASUS to Offer Eee PCs with 320GB HDD & Windows Vista?

Posted on Aug 22, 2008


According to reports, ASUS is said to be working on new N-series Eee PCs which are very likely to "shake up" the netbook market. Reasons? Not much is known about these N-series Eee PC (No official confirmation here whatsoever) except that they will likely feature up to 320GB spinning hard drives and full fledged Windows Vista installation.

If this ever sees the light of day, the N-series Eee PC will be priced between $480 - $640 range. It is expected to come in 10" size.

We hope ASUS doesn't fail in offering minimum of 2GB RAM since we hear the word Vista!


ASUS Eee PC

source

Make your Vista Computer invisible in a network

Posted on Aug 21, 2008

This short tutorial will tell you how you can hide your Computer running Windows Vista from being shown in a network to other computers connected to the same network. Suppose you are connected to a network of many computers then this could be helpful in order to prevent others from being accidentally connecting to your computer as it happens sometimes while browsing the network.


Here's how you can do this>>>

  • Click on Start button, type regedit in the search box and hit Enter
  • Inside the Registry Editor navigate to HKEY_LOCAL_MACHINE\SYSTEM\CurrentControlSet\Services\LanmanServer\Parameters
  • Right-click on Parameters, click on New >>select DWORD (32-bit) value >>type hidden and hit Enter


  • Now double-click on hidden and select Modify.
  • Type 1 in the Value data field and hit Enter
  • Close the Registry Editor and reboot your system for the changes to take effect.
  • Now to check if the tweak worked or not click on Start button, type cmd and hit Enter.
  • In the cmd prompt, type Net Config Server and hit Enter
  • On moving down you will see "Server hidden" and it's status is set to "Yes" which means now your computer is hidden in the network.

Most Handy Utilities - Sysinternals MegaPack

Posted on Aug 20, 2008

The Sysinternals Troubleshooting Utilities have been rolled up into a single Suite of tools. This file contains the individual troubleshooting tools and help files. It does not contain non-troubleshooting tools like the BSOD Screen Saver or NotMyFault.

The Suite is a bundling of the following selected Sysinternals Utilities:

v4.2 (July 16, 2008)
AccessChk v4.2 adds a new switch, -a, that dumps account rights and privileges, and reports non-canonical security descriptors (ones that have access control entries in an unsupported order).

1.32 (November 1, 2006)
This simple yet powerful security tool shows you who has what access to directories, files and Registry keys on your systems. Use it to find holes in your permissions.

v1.01 (November 27, 2007)
Active Directory Explorer is an advanced Active Directory (AD) viewer and editor.

v1.01 (November 20, 2007)
An LDAP (Light-weight Directory Access Protocol) real-time monitoring tool aimed at troubleshooting Active Directory client applications.

v1.1 (November 1, 2006)
Undelete Server 2003 Active Directory objects.

v2.10 (November 1, 2006)
Bypass password screen during logon.

v9.32 (July 24, 2008)
This Autoruns update adds support for several additional shell extension points, including copy hook, property sheet, and drag and drop handlers, fixes a bug in the Vista gadget parsing code and better handles malformed paths.

v4.14 (August 8, 2008)
This fully-configurable program automatically generates desktop backgrounds that include important information about the system including IP addresses, computer name, network adapters, and more.

v3.2 (November 1, 2006)
This screen saver not only accurately simulates Blue Screens, but simulated reboots as well (complete with CHKDSK), and works on Windows NT 4, Windows 2000, Windows XP, Server 2003 and Windows 9x.

v1.0 (November 1, 2006)
CacheSet is a program that allows you to control the Cache Manager's working set size using functions provided by NT. It's compatible with all versions of NT.

v1.0 (November 1, 2006)
View the resolution of the system clock, which is also the maximum timer resolution.

v1.0 (November 1, 2006)
Wish you could quickly defragment your frequently used files? Use Contig to optimize individual files, or to create new files that are contiguous.

v2.0 (November 1, 2006)
This is a kernel-mode driver that demonstrates keyboard input filtering just above the keyboard class driver in order to turn caps-locks into control keys. Filtering at this level allows conversion and hiding of keys before NT even "sees" them. Ctrl2cap also shows how to use NtDisplayString() to print messages to the initialization blue-screen.

v4.75 (August 8, 2008)
Another first from Sysinternals: This program intercepts calls made to DbgPrint by device drivers and OutputDebugString made by Win32 programs. It allows for viewing and recording of debug session output on your local machine or across the Internet without an active debugger.

v1.1 (May 14, 2007)
Display volume disk-mappings.

v2.01 (November 1, 2006)
This utility captures all hard disk activity or acts like a software disk activity light in your system tray.

v2.21 (November 1, 2006)
Graphical disk sector utility.

v1.31 (November 1, 2006)
View disk usage by directory.

v1.02 (November 1, 2006)
View information for encrypted files.

Filemon
v7.04 (November 1, 2006)
This monitoring tool lets you see all file system activity in real-time.

v3.41 (August 8, 2008)
This handy command-line utility will show you what files are open by which processes, and much more.

v1.0 (November 1, 2006)
Convert hex numbers to decimal and vice versa.

v1.05 (July 24, 2007)
Create Win2K NTFS symbolic links.

v1.02 (November 1, 2006)
Dump the contents of the Logical Disk Manager's on-disk database, which describes the partitioning of Windows 2000 Dynamic disks.

v2.25 (November 1, 2006)
List all the DLLs that are currently loaded, including where they are loaded and their version numbers. Version 2.0 prints the full path names of loaded modules.

v3.0 (November 1, 2006)
Use Microsoft kernel debuggers to examine a live system.

v1.0 (November 1, 2006)
See the order in which devices are loaded on your WinNT/2K system.

v1.0 (November 1, 2006)
List the active logon sessions on a system.

v1.0 (November 1, 2006)
Allows you to schedule move and delete commands for the next reboot.

v4.10 (November 1, 2006)
Learn about the computer SID problem everybody has been talking about and get a free computer SID changer, NewSID.

v1.0 (November 1, 2006)
Use NTFSInfo to see detailed information about NTFS volumes, including the size and location of the Master File Table (MFT) and MFT-zone, as well as the sizes of the NTFS meta-data files.

v2.32 (November 1, 2006)
Defragment your paging files and Registry hives.

v1.1 (November 1, 2006)
Enumerate the list of file rename and delete commands that will be executed the next boot.

v3.02 (November 1, 2006)
Monitor serial and parallel port activity with this advanced monitoring tool. It knows about all standard serial and parallel IOCTLs and even shows you a portion of the data being sent and received. Version 3.x has powerful new UI enhancements and advanced filtering capabilities.

v11.21 (August 8, 2008)
Find out what files, registry keys and other objects processes have open, which DLLs they have loaded, and more. This uniquely powerful utility will even show you who owns each process.

v1.37 (August 8, 2008)
Monitor file system, Registry, process, thread and DLL activity in real-time.

v1.10 (November 1, 2006)
This applet reports processor and Windows support for Physical Address Extensions and No Execute buffer overflow protection.

v1.94 (January 4, 2008)
Execute processes with limited-user rights.

v1.02 (December 4, 2006)
See what files are opened remotely.

v1.43 (December 4, 2006)
Displays the SID of a computer or a user.

v1.75 (July 9, 2007)
Obtain information about a system.

v1.12 (December 4, 2006)
Terminate local or remote processes.

v1.28 (December 4, 2006)
Show information about processes and threads.

v1.33 (December 4, 2006)
Show users logged on to a system.

v2.64 (December 4, 2006)
Dump event log records.

v1.22 (December 4, 2006)
Changes account passwords.

v2.22 (January 11, 2008)
View and control services.

v2.52 (December 4, 2006)
Shuts down and optionally reboots a computer.

v1.06 (December 4, 2006)
Suspend and resume processes.

v2.43 (February 12, 2007)
The PsTools suite includes command-line utilities for listing the processes running on local or remote computers, running processes remotely, rebooting computers, dumping event logs, and more.

v1.10 (November 1, 2006)
Scan for and delete Registry keys that contain embedded null-characters that are otherwise undeleteable by standard Registry-editing tools.

v1.0 (November 1, 2006)
Creates a key called "HKEY_LOCAL_MACHINE\Software\Sysinternals\Can't touch me!\0" using the Native API, and inside this key it creates a value.

v1.01 (November 1, 2006)
Jump to the registry path you specify in Regedit.

v7.04 (November 1, 2006)
This monitoring tool lets you see all Registry activity in real-time.

v1.71 (November 1, 2006)
Scan your system for rootkit-based malware.

v1.51 (November 1, 2006)
Securely overwrite your sensitive files and cleanse your free space of previously deleted files using this DoD-compliant secure delete program.

v1.6 (November 1, 2006)
Scan file shares on your network and view their security settings to close security holes.

v1.01 (February 28, 2008)
Launch programs as a different user via a convenient shell context-menu entry.

v1.53 (May 28, 2008)
Dump file version information and verify that images on your system are digitally signed.

v1.56 (April 27, 2007)
Reveal NTFS alternate streams.

v2.40 (April 24, 2007)
Search for ANSI and UNICODE strings in binaryimages.

v2.0 (November 1, 2006)
Flush cached data to disk.

v2.53 (January 11, 2008)
Active socket command-line viewer.

v2.0 (November 1, 2006)
Set Volume ID of FAT or NTFS drives.

v1.01 (November 1, 2006)
See who owns an Internet address.

v2.15 (November 1, 2006)
The ultimate Object Manager namespace viewer is here.

v2.10 (June 24, 2008)
Presentation utility for zooming and drawing on the screen.


Download Sysinternals Suite
(8 MB)

source

How to rectify the corrupt icons problem in Windows Vista

Posted on Aug 19, 2008

Sometimes icons does not appear correctly in Windows Vista because they get corrupted. This can be rectified by rebuilding the Icon Cache. In order to rebuild the icon cache we'll first have to delete it so that windows will rebuild it upon a system reboot.


Here's how you can do this>>>

  • First Enable Show hidden files and folders.
  • Open up My Computer
  • Navigate to %systemdrive%\Users\"your User Name"\AppData\Local
  • Look for IconCache.db and delete it permanently even from the Recycle Bin
  • Reboot your system.
  • Now you have your Icon Cache rebuilt and any corrupted icons that you might had should get corrected.

Make your Drive disappear in Windows Vista

Posted On Aug 18, 2008

Today I'm going to share a simple tutorial with you all. It will tell you how you can hide a Drive in Windows Vista. This will be helpful to you in case u want to hide your personal stuff from others, just put all that stuff in a drive and make it disappear .There may exist some third-party tools but this tutorial is as simple as any other thing could be.

Here's how u can do this>>>

  • Click on Start button, type gpedit.msc in the search box and press Enter
  • Click on Continue to bypass the UAC prompt.
  • In the left pane, navigate to User Configuration>> Administrative Templates>> Windows Components>>Windows Explorer.
  • In the right pane of the window double-click on Hide these specified drives in My Computer
  • In the dialog box that appears click on Enabled.
  • Select the drives you wish to hide from the drop-down menu given just below in the same dialog box
  • Click on Apply and OK and then close the Local Group Policy Editor.
  • To check if it worked or not you can open up My Computer and see if the drive that you selected to hide is there or not.

Work faster with Windows Vista

Posted on Aug 17,2008

In previous blog posts I’ve talked about how you can work faster by creating desktop shortcuts, enabling you to quickly accomplish tasks by simply clicking on them. I’ve recently found out about a neat little program called NirCmd which can help you to make shortcuts for all kinds of tasks, and makes working with Windows Vista faster than ever.
It’s available for free download from http://www.nirsoft.net/utils/nircmd.html. All you need to do is extract the files from the .zip archive folder and place it somewhere memorable. I recommend creating a new folder on your main hard drive (in my case C:\) and name it “nircmd”.

To create a shortcut, all you need to do is right-click on your desktop and go to New > Shortcut. In the location box type in the location of nircmd.exe (which is where you created the new folder) . In my case this is C:\nircmd\nircmd.exe. Then enter in the command from either the list found here or below.

For example, if I wanted to make a desktop shortcut that turned my PC’s sound on and off I would create a shortcut for:
C:\nircmd\nircmd.exe mutesysvolume 2

Then all I would need to do to mute the sound was click on that shortcut. If you right-click on your newly created shortcut and select Properties in the Shortcut key: textbox you can assign a key combination, such as Alt and M, to run the shortcut instantly!

short2

Here are some other commands that you can try:


cdrom open d:
Opens the door of your CD/DVD drive, where d: is the letter of your drive


monitor off
Turns off your monitor


screensaver
Turns on the screensaver


standby
Puts your computer into standby mode

exitwin poweroff
Turns off your PC

win min class "IEFrame"
Minimises all Internet Explorer windows

win close class "IEFrame"
Closes all Internet Explorer windows

setdisplay wwww hhhh cc
Sets your monitor’s display settings, where wwww is the width in pixels, hhhh the height in pixels and cc the number of colours. For example, if I wanted to create a shortcut to change my display settings to 1680x1050 resolution with 32bit colour I would define the shortcut’s location as C:\nircmd\nircmd.exe setdisplay1680 1050 32

dlg "" "" click yes
Answer Yes to a standard Windows dialogue box


There are many more commands you can add to your shortcuts; these can be found at http://www.nirsoft.net/utils/nircmd.html.
source


design your gmail and gcal with google redesigned

Posted on Aug 16,2008

forums copy

Google Redesigned is a Mozilla Firefox extension designed by Globex Designs that aims to fully redesign the look and feel of popular Google services. This is achieved with Cascading StyleSheet (CSS) files which are loaded on the client's browser. The extension simplifies the use of these styles by providing auto-updates, easy management and notifications of changes. You can also download and use the styles individually by going to their respective pages.

Screenshots of the Google Redesigned

01 02

04 05

011

How to Use

Using the extension is very simple. After you install the extension and restart your browser - everything is already setup for you. As soon as you visit a Google service which has a style associated with it, the extension will automatically download the latest version of the style and load it. You should also notice a small Google Redesigned Google Redesigned Icon icon in the bottom right corner of your screen. From here you can do a few things:

To check for new updates to styles manually you can press the "Check for Style Updates" button. This will let you know if any styles updates are available and if they are, the styles will be installed. If you don't click the button, the extension will automatically check for updates on a daily basis and install them for you.

Download

Source

Best Windows Vista Blog Contest 2008

Posted on Aug 15, 2008

WinVistaClub, in association with Windows Vista - The Official Magazine, is organising a contest to recognise some of the best Windows Vista Blogs and Websites.

So if you run a blog or a website, which primarily focuses on Windows Vista, we invite you to submit your Blog Title, Blog HomePage url along with upto a 4 line description about it. The blog may cover Microsoft & Windows in general, but must also cover Vista in particular. It could focus on Tips, Tutorials, Support Forums, Customization & Themes, News, Views, or anything which may interest a Vista user.

From among the submissions, the 10 best blogs will be picked up by a panel of Judges. The Panel of Judges include Steve Sinchak MVP of TweakVista.com, John Barnett MVP of Windows Vista Support, Kerry Brown MVP of VistaHelp.ca, Steven Bink of Bink.nu, James Stables of Windows Vista Magazine, Emil Protalinski of Arstechnica, Aryeh Goretsky MVP of Lockergnome.Com, Barney Tormey Global Moderator at Neowin and Anand MVP.The blogs will be judged on the basis of quality of content, integrity, along with the frequency of updates. And this is going to one difficult task.

The Winner of the WinVistaClub Best Windows Vista Blog Contest 2008 will also get a Windows Vista Ultimate 32/64 bit DVD Box Pack, a Free 1 year license of ESET Smart Security Suite, a License of Magic Utilities, a License of MagicTweak, a one year subscription to the Windows Vista Magazine and a link for 3 months on the WinVistaClub HomePage.

The 2 Runners-up will get a License of Magic Utilities & a subscription to the Windows Vista Magazine each.
The 4th and 5th runners-up, will get a subscription to the Windows Vista Magazine each !

And first 100 participants who submit their Blog/Website’s here will also get a FREE 6 months license of ESET Smart Security Suite !

The 10 blogs selected will be put up for vote from 26th Aug to 09th Sept. The winner & 2 runner ups will be picked up and the announced by around 15th Sept 2008.


mgctwk2 e729d653

For more details about the contest, CLICK HERE.

Cut-short your Vista Control Panel the way you want it !

Posted on Aug 14, 2008

Many of you folks who are using Windows Vista or I should say Windows must be well familiar with Control Panel. It’s a place where we can change settings for our hardware devices, windows and installed programs. Ya I know you all know this and obviously I’m not going to tell you this. What I’m going to tell you is that how you can tweak windows to display only those items that you want to see in Control Panel coz if you are not an advanced user you might not need all those items listed in the Classic View there for ex. Administrative Tools, Bit Locker Drive Encryption, Color Management, Default Programs, Indexing options etc. etc.
So in order to show only the items you need, just follow this simple tutorial. But first let me give you an idea of what we are going to do with the help of the screenshots given below:

cpl 1

( these are the default items in control panel showing in classic view)

cpl2

(these are the items which I prefer to see in control panel.)

Here’s how you can do this>>>>

1. Click the Start button, type gpedit.msc in the search box and hit enter.

2. Click Continue if you have UAC enabled (by default UAC is enabled).

3. In the left pane of the Local Group Policy Editor, navigate to User Configuration>> Administrative

Templates>>Control Panel.

cpl3

4. In the right pane of the window, double-click on Show only specified Control Panel items

5. In the dialog box that appears select Enabled

dialog

6. Now to add the list of items click on Show button given below in the same dialog box.

7. In the Show Contents dialog box, click on Add button.

8. Now type the name of the Control Panel item which you wish to show and click OK. You can add as many number of items as you want by choosing from the control panel.

9. Now you can close the Local Group Policy Editor.

NOTE: Suppose you want to show 90% of the items (means you want to hide only 4 or 5 items) in the control panel then you’ll have to repeat the step no. 8 quite a serious no. of times which is not handy.So here comes the tricky part. If you want to hide only 4 or 5 items in the CPL, double-click on Hide specified Control Panel items instead of Show specified Control Panel items in Step no. 4. and follow the rest of the tutorial as it is.

Intel Nehalem's Market Named Leaked to be Core i7

Posted on Aug 13,2008

Making its way around the Internet late last week was speculation of the official name for Intel’s future processor microarchitecture, currently codenamed Nehalem.

If the rumors are to be correct, the Intel Core i7 and Intel Core i7 Extreme Edition processors will officially be announced August 11 with an expected launch date of Q4 2008.

Nahalem is expected to be initially manufactured with a 45nm process and be available with two, four, or eight cores, for up to 731 million transistors in the quad core variant. A very exciting aspect of the new architecture is the new integrated memory controller, called the Intel QuickPath Interconnect, with DDR3 SDRAM support, which will eliminate the bottleneck that was the front side bus and which had been haunting Intel for years. This should result in a substantial performance increase despite Intel’s competition, AMD, having been using an integrated memory controller in their processors for years.

Another feature of Nahalem will be the re-introduction of Hyper-Threading technology, which was used previously in the Pentium 4 series of processors. Hyper-Threading allows a single core to run an adjacent virtual core, allowing for two threads per actual core, making for potential performance gains. With all the added performance of the upcoming Nahalem processors, power usage is not expected to rise much, providing for greater performance-per-watt efficiency.

Nehalem will come in variants for desktops, servers, and notebooks. The upcoming home desktop variant is codenamed Bloomfield and will use the new LGA1366 socket, making it incompatible with all previous generation motherboards.

Source