First look at Microsoft IE 8 RC1 and Download Link

First Look – Microsoft quietly released the first update to its IE8 beta 2 to its closest partners last week. This new version is marked as “Release Candidate 1” and is expected to be the final IE8 pre-release update Microsoft intends to make available to the public sometime in the first quarter of 2009. TG Daily was able to take the browser for a first spin: We noticed that Microsoft made significant progress in some areas, but is standing still others. RC1, which is believed to be the first feature-complete version of the browser, will not match the JavaScript performance of all other major browsers.

ie8rclogo

The first update to Microsoft’s browser since IE 8 beta 2 was released to select Microsoft partners for testing last Wednesday. The company indicated in recent blog posts that it was delaying the browser for some time and that it may have a good reason to do so. A final public and feature-complete pre-release would become available in Q1 2009 and, of course, we were curious what may have canceled a 2008 release of the browser.

Will Microsoft shelve the browser engine? Will Microsoft follow through with its promise to make its browser much more compliant with web standards than previous versions were? We were lucky enough to get an early look at this final pre-release and now have a good idea how IE8 will look like. But, since this software is a partner release, it is more than likely that Microsoft will make one or the other change based on feedback until a public RC1 will surface. However, significant changes are rather unlikely.

Let’s cut to the chase right away…….read more @ source

Download Link:

Download Windows Internet Explorer 8 Release Candidate 1 for Windows Vista 32-bit
Download Windows Internet Explorer 8 Release Candidate 1 for Windows Vista 64-bit
Download Windows Internet Explorer 8 Release Candidate 1 for Windows 2003 and XP 32-bit
Download Windows Internet Explorer 8 Release Candidate 1 for Windows 2003 and XP 64-bit
Download Windows Internet Explorer 8 Release Candidate 1 Readme file

How to Add Delete Folder Contents to Right Click Context Menu in Windows Vista / Windows 7

With the help of this tutorial you can add the option Delete Folder Contents to the right-click context menu which appears when you right-click a folder.This would come handy at times when you want to delete all the files inside a folder and all it’s sub-folders without deleting the folders themselves.

d

Here’s how you can do this:

  • Click on Start button, type regedit in the search box and hit enter.
  • In Regedit, go to: HKEY_CLASSES_ROOT\Directory\shell
  • Right-click on shell, create a new Key and name it Delete Folder Contents

2                                           v

                                                      v3

  • Again right-click on Delete Folder Contents, create a new Key and name it command

4

  • In the right pane, double-click on (Default) string value and type

       cmd /c "cd /d %1 && del  /s /q *.* in the value data field  and hit OK

5

  • Close Registry Editor and your done.

Turn on Sidebar with UAC disabled in Windows 7

If you have Windows 7 Beta installed with UAC disabled you might run into problems while trying to load gadgets onto your desktop.You can enable the UAC in order to use Sidebar.But if you don't wanna turn on that nagging UAC and still love those tiny useful gadgets you can bring them aboard by following these steps:

  • Click on Start button, type regedit in the search box and hit enter.
  • In regedit, go to :
HKEY_LOCAL_MACHINE\SOFTWARE\Microsoft\Windows\CurrentVersion\Sidebar\Settings 
  • In the right pane,right-click and select DWORD(32-bit) Value from the New menu.
  • Rename the DWORD Value to AllowElevatedProcess. Double-click on it and type 1 in the Value data field.

Capture
  • Close Registry Editor and try to load the gadgets.They should work.

Thanks Chris for finding the registry

How to Enable or Disable Taskbar Thumbnail Preview in Windows 7

Posted on Jan 16, 2009


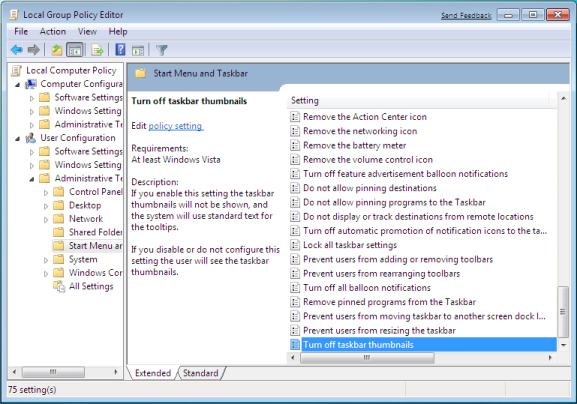
Follow the steps given below to disable the Thumbnail Previews: 

 
1. Click on start and type on search bar gpedit.msc and press enter
2. Now navigate to User Configuration, Administrative Templates, and Start Menu and Taskbar in left pan of Group Policy Editor

 
3. Locate “Turn off Taskbar Thumbnails” in right pan of Group policy editor and double click on it.
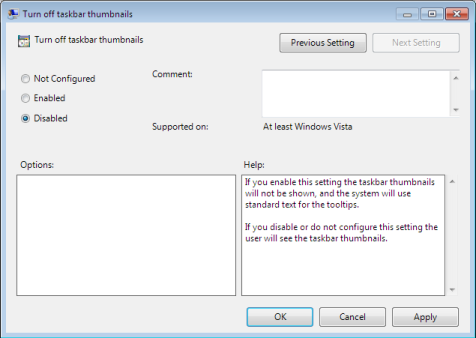
4. Select Disable, click Apply and Press ok
5. Now check your Taskbar, it shouldn’t show Thumbnails Preview .
In order to Enable the Taskbar Thumbnail Previews again,  select Enable in step 4.
Please Note: Taskbar Thumbnail Preview only works when you haveEnabled Aero in Windows 7.


Source

How to Speed Up Taskbar Thumbnails in Windows 7


Posted on Jan 14, 2009


Windows 7 brings a new enhanced Taskbar a.k.a Superbar, the most interesting changes  made in the GUI. When you hover your mouse on the program icon, it shows the thumbnail previews of the program.You can change the delay time that the mouse pointer has to stay hovered over an item before that item's thumbnail preview is displayed.

Here's how you can do this>>>

1. Click on the Start button, type regedit in the search box and hit enter.
2. Now you'll have Registry Editor open. Navigate to HKEY_CURRENT_USER\Control Panel\Mouse


3. In the right pane, double-click on MouseHoverTime and type any value less than 400, say 20 in the Value data field (the values are in milliseconds). If u want them to appear ultrafast then type 0.


4.  Now close Registry Editor and restart the computer to see the results.
Now hover your mouse on any taskbar icon and see if thumbnails are appearing faster than before.

How to burn ISO/IMG files in windows 7

Posted on Jan 13, 2009

Windows 7 has now got a built-in Disc Image Burning Tool. Now we can easily burn ISO files using this tool. Though it doesn't support formats like Bin, Nrg and lots of others but atleast the widely used is now supported.

  Here's how you can do this>>>
  1. Double-click or right- click any iso file that you want to burn (make sure u've a blank cd/dvd media inserted in cd/dvd burner)
  2.A window will pop-up. Here select ur CD/DVD drive and click on Burn button   given below.


  3.You can also check the "Verify disc after burning" option to verify the disc. ( i personally never used it even in nero, it takes longer time)

    Install Windows 7 via USB or SD Media

     Posted on Jan 12, 2009

     
     So Windows 7 beta is out the door and you are ready to begin your beta experience.  Over the next few months there will be additional builds for Windows 7 (x86 and x64) as well as Windows Server 2008 R2 and that leads to a lot of installs and a lot of DVD burning and useless DVDs as soon as a new build is out.  So why not install from USB or whatever other removable media your computer can boot from?  Insert your removable media into a Windows XP or Vista PC and run the following commands from an elevated command prompt. 
    1. diskpart
    2. list disk (find the disk number for the removable media)
    3. select disk #
    4. clean
    5. create partition primary
    6. select partition 1
    7. active
    8. format fs=fat32
    9. assign letter=y (or any free drive letter)
    10. exit

    Once that is complete mount the ISO and run the following command.

    xcopy x:\*.* /s/e/f y:\

    Where “x” is the drive letter of the mounted ISO.  Once complete boot off the device and install the OS.  When a new Windows 7 or 2008 R2 build is released, simply delete the contents, rerun the xcopy command and you are ready to go again.  As a note this also works for Windows Vista and Server 2008 but you already figured that out :)